Description
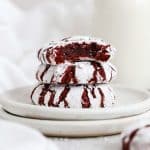
These fudgy gluten-free red velvet cookies get rolled in powdered sugar for a pretty crackled effect. They’re extra gorgeous as a holiday or Valentine’s cookie!
Ingredients
Scale
For The Red Velvet Cookie Dough:
- 2 cups (240 grams) gluten-free measure for measure flour, weighed or scooped and leveled
- 1/3 cup (35 grams) unsweetened cocoa powder* (natural cocoa NOT Dutch-processed cocoa)
- 1 teaspoon baking powder
- 1/4 teaspoon baking soda
- 1/2 teaspoon kosher salt
- 1/2 cup (8 Tablespoons, 4 oz) butter, room temperature
- 3/4 cup (150 grams) sugar
- 1/2 cup (100 grams) brown sugar
- 2 large eggs, room temperature
- 1 Tablespoon milk
- 2 teaspoons vanilla extract
- 1–1 1/2 teaspoons red gel food coloring (like Ann Clark, Wilton, etc.)**
To Roll The Cookies:
- 1/3 cup sugar
- 1/2 cup powdered sugar
Instructions
- Preheat The Oven & Prep Your Pan. Start by preheating the oven to 350 degrees F. Line two baking sheets with parchment paper.
- Set Out Your Rolling Station. Get your rolling station ready by setting out two shallow bowls. Pour 1/3 cup sugar into one of the bowls and and 1/2 cup powdered sugar into the other.
- Combine The Dry Ingredients. In a medium bowl, combine gluten-free flour blend, cocoa powder, baking powder, baking soda, and salt. Whisk to combine, then set aside.
- Cream Butter & Sugars. In a stand mixer with a paddle attachment or a large bowl with a hand mixer, cream the butter, sugar, and brown sugar for 2-3 minutes, or until light and fluffy.
- Add Eggs One At A Time. Scrape down the edges of the bowl and add eggs one at a time, mixing to incorporate each egg before adding the next one.
- Mix In Vanilla, Milk & Dye. Then, add the vanilla, milk, and red gel dye. Stir or mix until evenly blended.
- Add The Dry Ingredients. Scrape down the edges again and add the dry ingredients while the mixer is going on low speed until just combined. The dough will be like thick, sticky brownie batter. (Don’t add extra flour!)
- Scoop & Roll. Use a medium scoop to scoop 1 1/2 Tablespoon size balls of dough. Roll each cookie dough ball smooth in your hand, then roll first in the granulated sugar, then in the powdered sugar. Place 6 cookie dough balls on a baking sheet and bake just one batch at a time. (This helps the cookies bake more evenly)
- Bake & Cool. Pop the baking sheet in the oven and bake cookies 9-10 minutes or until set on the edges and slightly underdone in the centers. Cool 2 minutes on the baking sheet (this will help them finish setting) and transfer to a wire rack to cool completely. Switch baking sheets for the next batch, so you don’t put cool dough on a hot baking sheet. Repeat until all the cookies are baked.
- Serve Or Store cookies in an airtight container 3-4 days at room temperature, or freeze up to 2 months.
Notes
*Be sure to use natural unsweetened cocoa (like Hershey’s or Ghirardelli) rather than dark cocoa/Dutch processed cocoa. Dark cocoa will muddy the color and they won’t look like red velvet.
**Gel food color will give you the strongest red color and won’t throw off the liquid to dry ratio as much as liquid food dye does. Natural food dyes also won’t be strong enough, so this is an occasion for gel food color. We like brands like Ann Clark, Wilton, and AmeriColor.
- Prep Time: 20 minutes
- Cook Time: 36 minutes
- Category: Dessert
- Method: Oven
- Cuisine: American
