Description
The ULTIMATE dessert for an Oreo lover! This Oreo cheesecake recipe is PACKED with Oreo cookie flavor in every layer!
Ingredients
Scale
Equipment:
- 9-inch Springform Pan
- Foil
- A Slow Cooker Liner Bag or Oven Bag
- Large Pan, For Hot Water Bath
- Optional: piping bag + piping tip for whipped cream*
For The Gluten-Free Oreo Crust:
- 24 Gluten-Free Oreo Cookies*
- 4 Tablespoons Butter, Melted
For The Oreo Cheesecake Filling:
- 4 (8-ounce) Blocks Full-Fat Cream Cheese, like Philadelphia (2 pounds total), room temperature*
- 1 cup Granulated Sugar (200 grams)
- 8 ounces Sour Cream (about 1 cup), room temperature*
- 1 1/2 teaspoons Vanilla Extract
- 1 Tablespoon Cornstarch
- 4 Large Eggs, room temperature
- 15 Gluten-Free Oreo Cookies, cut into quarters (ONLY add larger Oreo pieces to cheesecake. Save any fine crumbs to decorate with at the end.)
For Ganache:
- 6 oz. chopped dark Chocolate or 1 cup semisweet or dark Chocolate Chips
- 1/2 cup Heavy Cream
Additional Decorations:
- 1 cup Heavy Cream
- 2 Tablespoons Powdered Sugar
- 1/4 teaspoon Vanilla Extract
- 6–8 Gluten-Free Oreos, chopped
- 12–15 Gluten-Free Oreo cookies (whole cookies!)
Instructions
For The Gluten-Free Oreo Cheesecake Crust:
- Preheat & Prep. Start by preheating the oven to 325 degrees F. Line a 9-inch springform pan with parchment paper. (I love to use pre-cut parchment rounds)
- Crush Oreos. Add gluten-free Oreo cookies to a food processor. Pulse until you’ve crushed the cookies to fine crumbs with no big lumps. (Don’t have a food processor? You can do this in a large zip-loc bag with a rolling pin.)
- Add Butter. Next, add melted butter to cookie crumbs and pulse or stir to combine, until all crumbs are coated with butter.
- Pat Out Crust. Pour the crust mixture out into your prepared springform pan and use your fingers or the back of a measuring cup or drinking glass to pat the crumbs out into an even layer along the bottom of the pan and up the sides. Note: the crust will not go all the way up the sides of the pan. Just about 1 inch up the sides!
- Bake & Cool. Place the crust in the preheated oven and bake 10-12 minutes or until fragrant. Set the crust to the side to cool while you make the filling.
- Prep Pan For A Hot Water Bath. If Using A Hot Water Bath (Recommended), wrap the bottom and sides of the springform pan with foil. To fully waterproof the pan (*highly recommended*), place the springform pan into a slow cooker liner bag or an oven bag/turkey bag. Pull the bag up the sides of the springform pan, then gather the excess to one side and knot tightly to keep the bag secure to the sides.
For The Oreo Cheesecake Filling:
- BEFORE YOU GET STARTED: Make sure the cream cheese, sour cream, and eggs are all brought to room temperature or the filling will not mix correctly. Do not skip this step!
- Maintain Oven Temperature of 325 degrees F. Make sure you have a rack arranged in the center of the oven.
- Prepare For Water Bath. Start bringing a small pot of water to a boil while you make the cheesecake. Set out a large roasting pan for a traditional water bath or a 9×13 pan for a modified hot water bath (SEE NOTES)
- Combine Cream Cheese & Sugar in the bowl of a stand mixer fitted with a paddle attachment, or a large mixing bowl with a handheld electric mixer. Beat the softened cream cheese and sugar together on medium-low speed 2-3 minutes, or until smooth and well blended.
- Add Sour Cream, Cornstarch & Vanilla to the cream cheese mixture and mix on LOW speed until just barely combined. (Keep in mind that you don’t want to add any extra air to the cheesecake, so mixing by hand or on low speed at this point is very helpful!)
- Add Eggs One At A Time on LOW Speed, until just barely mixed.
- Add 15 Chopped Oreos, adding JUST the larger pieces and saving any fine crumbs to decorate with at the end. Adding fine crumbs here will make your cheesecake look muddy. Gently stir to distribute the cookies evenly throughout the cheesecake batter. Gently tap the bowl against the counter to help remove any air bubbles.
- Pour Filling Over The Crust and smooth the surface with a spatula.
- Create Hot Water Bath. Carefully pour 3/4 to 1-inch of boiling water into the bottom of the roasting pan. Carefully lower the prepared & wrapped springform pan into the water so the water comes about 1-inch up the sides of the springform pan. (See notes for modified hot water bath instructions)
- Bake. Transfer the pan to the oven and bake cheesecake 60-70 minutes or until the edges are just set and the center gently wobbles (like Jell-o or gelatin). If the center still seems sloshy and liquid, add 3-5 minutes to the bake time and check again. (Err on the side of under-baking rather than over-baking)
- Cool 1-Hour In The Oven. When the cheesecake is finished baking, turn OFF the oven heat and crack the oven door open 2-3 inches. Let the cheesecake cool IN the oven for 1 full hour. (To help prevent cracks, you can run a thin knife around the edges of the springform pan before letting it cool.) Remove the springform pan from the hot water bath and the slow cooker liner/oven bag.
- Chill Cheesecake Uncovered in The Fridge AT LEAST 4-6 Hours (up to overnight) before decorating.
To Decorate Oreo Cheesecake:
- Prepare Ganache. Add chocolate/chocolate chips to a heat-proof bowl. Heat cream in a small saucepan or in a microwave-safe bowl until steaming and almost simmering. Pour hot cream over the chocolate and use a spatula to tuck the chocolate under the hot cream. Let the mixture sit for 4-5 minutes, then whisk until the chocolate is fully melted. You can add corn syrup to the ganache to make it extra glossy and to make it softer (which helps when cutting into the cheesecake).
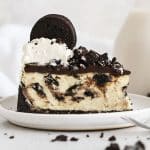
- Decorate With Ganache & Add Oreos. Spread ganache over the top of the cheesecake into an even layer. (If desired, you can set aside 1-2 Tablespoons or so for drizzling on at the end.) Sprinkle the chopped Oreos in a circle in the center of the cheesecake, stopping about 1-inch before the edge of the cheesecake. Drizzle any leftover ganache over the Oreo cookies.
- Prepare Stabilized Whipped Cream. In a glass or metal bowl or a stand mixer, beat heavy cream on medium speed until it starts to get fluffy. Add powdered sugar and vanilla and whip on high heat until stiff peaks form. (The whipped cream should hold its shape on your spatula even when you rotate it around.)
- Pipe Whipped Cream Swirls. Add whipped cream to a piping bag fitted with a piping tip (I used an Ateco 849 closed star tip) and pipe small swirls of whipped cream around the border.
- Decorate With Oreos. If desired, tuck whole Oreo cookies upright in between the whipped cream swirls. Sprinkle whipped cream with any leftover fine crumbs you have.
Serve & Store:
- Serve. Enjoy right away or store uncovered in the refrigerator until ready to serve. Before cutting, let the cheesecake sit out 10-15 minutes so the ganache can soften slightly. Use a long, thin knife to cut cheesecake into thin slices. Wipe the knife off with a damp cloth between slices for the neatest cuts.
- Store leftover cheesecake covered in the refrigerator 3-4 days.
- Freeze. To make this cheesecake in advance, you can bake and cool it, including the 4-6 hour chill time. For best results, freeze WITHOUT decorating. Freeze uncovered on a baking sheet till firm, then wrap tightly in foil or plastic wrap and then tuck into a freezer bag. Store in the freezer up to 2 months. Thaw in the fridge, then decorate as desired before serving.
Notes
Ingredients + Tips:
- OREOS. Regular Oreos (blue package) are NOT gluten-free. To keep this gluten-free, you must buy the Gluten-Free Oreos (white package). Or, you can choose another brand of gluten-free chocolate sandwich cookies, like Goodie Girl, Glutino, Kinnikinnick, etc. I recommend 2 full packages so you’ll have plenty for the crust, the filling and the decoration! (Gluten-Free Oreos come in packs of 30)
- CREAM CHEESE. We only recommend blocks of full-fat cream cheese for cheesecake. Do not use cream cheese spreads. Our go-to brand is Philadelphia for taste and texture.
- PIPING TIP. To pipe the whipped cream swirls, I used an Ateco 849 closed star tip.
- SOFTEN INGREDIENTS FASTER. Do NOT microwave any of the ingredients to soften them! Instead, fill a bowl with warm (not hot!) water and place eggs, closed container of sour cream and sealed packages of cream cheese in the bowl.
Hot Water Bath Instructions:
- For Traditional Water Bath: Follow instructions above in recipe card.
- For Modified Hot Water Bath: If you don’t have a pan large enough to fit a 9-inch springform pan, you can place a 9×13 pan on a rack below the center rack in the oven. Fill 9×13 pan with boiling water before placing the springform pan on a sheet pan on the center rack in the oven above the 9×13. The steam coming from below will help you prevent cracks and help control browning.
- If You Choose NOT To Use A Hot Water Bath, just keep in mind your cheesecake will brown more than mine and may form cracks as it bakes or cools. This is purely cosmetic, and will be covered up by the ganache and decorations at the end!
- Prep Time: 45 minutes
- Chill Time: 6 Hours
- Cook Time: 60 minutes
- Category: Dessert
- Method: Oven
- Cuisine: American
