Description
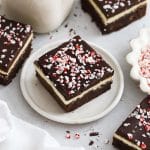
These gluten-free peppermint brownies have 4 delicious layers of flavor–a chewy brownie base topped with peppermint frosting, fudgy chocolate ganache, and crunchy crushed candy canes. They’re packed with delicious flavor in every bite!
Ingredients
Scale
For The Brownies:
- 1/2 cup butter (113 grams/8 Tablespoons)
- 2/3 cup semi-sweet or dark chocolate chips (4 oz./113 grams)
- 1 cup granulated sugar (200 grams)
- 2 large eggs + 1 egg yolk (save extra egg white for another use)
- 2 teaspoons vanilla extract
- 3/4 cup gluten-free measure-for-measure flour, weighed or scooped and leveled (90 grams)
- 1/4 cup Dutch processed cocoa powder (28 grams)
- 1/2 teaspoon kosher salt
- 2/3 cup semisweet or dark chocolate chips (4 oz./113 grams)
For The Peppermint Frosting:
- 1/4 cup butter, softened to room temperature (57 grams/4 Tablespoons)
- 2 ounces cream cheese, softened to room temperature (57 grams/4 Tablespoons)
- 2 cups powdered sugar (240 grams)
- 1 Tablespoon heavy cream
- 1/2 teaspoon peppermint extract (use 1/4 teaspoon for milder flavor)
For The Ganache:
- 1 cup dark or semi-sweet chocolate chips, (6 oz/170 grams)
- 2/3 cup heavy cream (160 mL)
- 1 Tablespoon butter (optional)
To Finish:
- 2–4 Tablespoons crushed peppermint candies or crushed candy canes
Instructions
Start With The Brownie Layer:
- Preheat The Oven & Prep The Pan. Start by preheating the oven to 325 degrees F. Line an 8×8″ metal pan with parchment paper and set aside. (Use a METAL pan here, or the brownies won’t bake the same)
- Combine The Dry Ingredients. In a medium bowl, combine the gluten-free flour blend, cocoa powder, and salt. Whisk to combine.
- Melt The Butter & Chocolate. In a medium saucepan, melt and 2/3 cup chocolate chips over low heat. Stir until the butter chocolate chips are melted and remove from heat. Let the mixture cool slightly while you mix up the eggs and sugar. (You can also melt the butter/chocolate in a microwave-safe bowl in 20-second increments, if preferred)
- Whip Sugar, Eggs & Egg Yolk. In a large mixing bowl, whisk sugar, eggs and egg yolk 2-3 minutes or until lighter in color, about double in volume, and the sugar is mostly dissolved. (A hand mixer helps this job go faster!) Don’t rush this step–it helps give your brownies the perfect fudgy, chewy texture & signature crackly tops you’re looking for!
- Mix Chocolate Mixture Into Egg Mixture. Slowly pour cooled chocolate mixture into the egg mixture, and mix in the vanilla extract.
- Stir In The Dry Ingredients. Add the dry ingredients and stir until just a few small pockets of powder remain.
- Fold In The Chocolate Chips. Add the second 2/3 cup chocolate chips, and fold in with a spatula until just evenly distributed and no more powdery spots remain. Transfer the brownie batter to your prepared pan and smooth the surface evenly.
- Bake The Brownies. Pop the brownies in the oven and bake for 25-27 minutes or until the surface no longer jiggles in the center and the brownies look set around the edges. (Try not to over-bake, as this will dry the brownies out a bit.)
- Cool Completely. Then, let the brownies cool completely. If they’re even a little bit warm, it will melt the frosting. (Popping the pan in the fridge on a wire rack once it’s cooled somewhat can help speed this step up)
When The Brownies Are Cool, Make The Peppermint Frosting Layer:
- Combine. In a large bowl or a stand mixer, combine softened butter, softened cream cheese, and powdered sugar. Beat with a paddle attachment or hand mixer 2-3 minutes, or until it is well combined and creamy. (At first, it may seem powdery and shaggy–just keep mixing! As long as you softened the butter & cream cheese, it WILL come together!)
- Finish The Frosting. Scrape down the sides of the bowl, and add cream and peppermint extract. Whip the frosting on medium heat 1 more minute, or until light, fluffy, and easy to spread.
- Check The Texture. You want the frosting to be easily spreadable, but not liquid. If your frosting seems too stiff to spread, add 1/2 teaspoon of cream at a time until it loosens back up. If it’s too loose and doesn’t hold its shape, add 1-2 Tbsp. powdered sugar at a time until it’s spreadable and holds its shape.
- Frost the cooled brownies. Dollop the peppermint cream cheese frosting around the top of the brownies and smooth into an even layer. (an offset spatula makes this easy!)
-
Chill. Next, place the brownies in the refrigerator to chill while you make the ganache layer.
Finish With The Ganache Layer:
- Heat The Cream To Steaming. Heat 2/3 cup heavy cream on the stove over medium heat (or in a microwave-safe bowl in 30-second increments) until steaming. It should be near boiling or it won’t be hot enough to melt the chocolate. Remove from the heat.
- Add Chocolate & Stir To Melt. Immediately add the chocolate and 1 Tablespoon butter to the hot cream and stir until the mixture is smooth and glossy. Let the ganache cool just slightly so it’s not hot to the touch. (You don’t want it to melt the frosting!)
- Spread Over Brownies. Pour the ganache over the peppermint frosting layer and smooth into an even layer with a spatula. You can gently tap the pan on the countertop to pop any bubbles & smooth the ganache. Sprinkle with crushed peppermint candy now or set a timer and add it in 10-15 minutes when the ganache has set a bit more.
- Chill To Set. Return the brownies to the refrigerator and chill until the ganache layer is fully set.
- Slice & Serve. Chill the finished brownies uncovered until you’re ready to serve. Cut into squares or rectangles and serve within 2 hours of keeping them out at room temperature. I like to cut the brownies into 9 large squares, then cut the squares in half for 18 small rectangles. These brownies are rich!
- Store leftover brownies in an airtight container in the fridge 2-3 days or freeze brownies in a freezer bag up to 2 months.
Notes
- For The Cleanest Cuts, use a long, sharp knife to slice the brownies when cold, and wipe the knife off between cuts for best results. I promise it makes a difference in these layered brownies!
- Gluten-Free Flour. We recommend King Arthur Measure-For-Measure Gluten-Free Flour blend for this recipe (and all our cookies & brownies!) If using another brand (like Bob’s Red Mill), make sure your flour blend contains xanthan gum, or the brownies will not turn out properly. Do not substitute almond flour, coconut flour, or oat flour in this recipe.
- Boxed Brownie Mix. If desired, you can substitute your favorite boxed mix brownies for my homemade brownies recipe. Make the brownies as directed in an 8×8 pan.
- Prep Time: 30 minutes
- Chill Time: 2 Hours
- Cook Time: 35 minutes
- Category: Dessert
- Method: Oven
- Cuisine: American
