Gluten-Free Brown Butter Brownies
This post may contain affiliate links. See our disclosure policy for more.


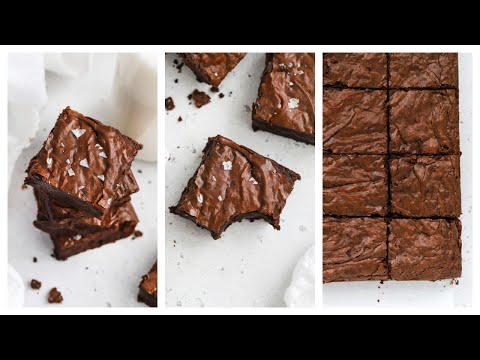
Let’s make Gluten-Free Brown Butter Brownies! These fudgy gluten-free brownies are perfect for a cozy day or chocolate craving.

I have a soft spot for Nora Ephron movies.
They’re one of my comfort watches–when I need something cozy, or familiar, or lovely. You’ve Got Mail is my forever favorite–from the soundtrack, to the late-90’s clothes, to the admittedly cheesy love story.
I’ll change into pajamas early, wrapping myself up in a fluffy blanket and settling down on a couch with too many throw pillows as I bite into a warm brownie while Tom Hanks and Meg Ryan type emails to each other and talk about books. From the soundtrack, to the late 90’s clothes, to all the fun one-liners, it’s just one of my favorites.
These gluten-free brown butter brownies were MADE for watching a cozy movie. With their signature glossy, paper-thin tops to the fudgy middles and decadent chocolate flavor, they’re the perfect brownie for a cozy night in. Or a rainy or snowy afternoon. Or after a long, no-good day.
They’ll hit all the right notes, and you’ll get it all from a few simple ingredients and techniques.
Here’s what you’ll need to get started…

Start With Simple Ingredients
Here’s what you’ll need to make these gluten-free brown butter brownies
- An 8×8″ Baking Pan. You’ll be using an 8″x8″ square baking pan for these gluten-free brown butter brownies. I recommend a light-colored pan (like this one!) for even baking.
- Butter. The secret of this gluten-free brownie recipe is the brown butter. It gives caramel/toffee notes to the brownies and makes them tender and fudgy in all the best ways.
- Semi-Sweet or Dark Chocolate Chips or Chopped Chocolate. Combined with the butter, you’ll melt plenty of chocolate chips or chopped chocolate to give these brownies a luscious, fudgy texture.
- Brown Sugar. The secret to glossy, crackly-topped brownies is dissolving sugar in eggs before mixing it into the batter. For these gluten-free brown butter brownies, I use brown sugar to keep these gorgeous and fudgy.
- Eggs. The eggs will help the sugar dissolve and will give these brownies some puff and lift.
- Vanilla & Salt. Some vanilla and salt balance the flavors and make these taste even more amazing.
- Cocoa Powder. Unsweetened cocoa powder adds a lovely intense chocolate flavor. I prefer to use dark cocoa powder (often labeled Dutch-processed or alkalized cocoa).
- Gluten-Free Flour. Just the right amount of measure-for-measure gluten-free flour (I highly recommend this one from King Arthur) holds these brownies together without turning them cakey or dry.
- Mix-Ins. If you like, you can absolutely mix in chopped walnuts or some chocolate chips.
PSST! Here’s How To Brown Butter
I’m sharing quick instructions below in the recipe card, but if you’ve never made brown butter or could just use a little refresher, this Brown Butter Tutorial is an easy, step-by-step method (with an in-depth video!) that’ll walk you through every part of the process.
How To Make Gluten-Free Brown Butter Brownies, Step By Step
As always, you can find the full recipe, with ingredient amounts, detailed instructions, and tips in the recipe card below.

- Preheat & Prep. To start, preheat oven temperature to 325 degrees F. Line a metal 8×8″ baking pan with parchment paper.
- Brown Butter. Next, add the butter to a light-colored saucepan and cook over medium heat, stirring constantly, until the butter foams and the butter underneath the foam has deepened to a honey color and the butter smells sweet and fragrant.
- Melt Chocolate. Remove the butter from the heat and stir in the chocolate chips. Whisk until the chocolate is totally melted, smooth, and glossy. Let the chocolate cool a few minutes.
- Whip Eggs & Brown Sugar. While the chocolate cools, combine brown sugar and eggs in a medium glass bowl. Whisk until the mixture has lightened in color and roughly tripled in volume. This will take 3-5 minutes or so, though you can speed the process by using a hand mixer. The sugar should be completely dissolved–if you rub the mixture between your fingers, there shouldn’t be any sugar crystals or grit.

- Combine Egg Mixture & Chocolate Mixture. When the eggs/sugar are lighter in color and totally dissolved, whisk the mixture into your cooled chocolate until well combined and incorporated.
- Finish Batter. Add vanilla, salt, cocoa powder, and gluten-free flour. Stir with a spatula, until the flour is just barely incorporated. If adding nuts or chocolate chips, fold them in with a spatula at this point.
- Bake Brownies. Pour the brownie batter into your prepared baking dish. Bake brownies at 325 degrees F. 22-25 minutes, or until the top is shiny and glossy, and a toothpick inserted in the center comes out with a little bit of mostly done batter. It shouldn’t be liquid-y (under-baked) and shouldn’t be dry (over-baked)
- Cool & Cut. Allow the brownies to cool at least 20-3o minutes before cutting into 12-16 pieces. Feel free to garnish with some flaky sea salt, if desired.
- Serve & Store. Enjoy right away or store leftover brownies in an airtight container at room temperature 2-3 days. Or, freeze up to 2 months.

Tips & Tricks For The Best Brown Butter Brownies
Everyone has their best method for making brownies, but these are a few of my best brownie tips:
TIP#1: Dissolve The Sugar Completely In The Eggs.
Love that crackly browny top on your brownies? The glossy, paper-thin layer on top? I get that by making sure the sugar is totally dissolved in the eggs before adding that mixture to the batter. You’ll truly need to beat the eggs and sugar together for 5-8 minutes by hand (or 2-3 minutes with a hand mixer) to complete the process. (The sugar should be totally dissolved and the egg/sugar mixture should roughly triple in volume. A hand mixer can make this easier on you!
Tip #2: Prepare Your Pan Properly
(Say that 10x fast!) All joking aside, preparing your pan properly will really help your brownies cook evenly and come out of the pan easily later. Use a light-colored pan (so they brown/cook evenly), and line the pan with parchment. Let the parchment hang over the sides like handles so it’s easy to lift the brownies out of the pan later.
Tip #3: COOL BEFORE SLICING. REALLY.
I LOVE a warm brownie just as much as the next person, but your brownies really do need to cool at least 20-30 minutes before you slice them. They’ll still be warm and gooey and lovely, but they’ll have time to set and won’t smear or fall apart when you try to cut them. I promise it’s worth the wait!

FAQ – Frequently Asked Questions
How do you get that glossy crackly top on brownies? There’s some debate, but my secret is making sure the sugar is completely dissolved before adding them to the batter. We do this by beating the eggs and sugar together until they’ve nearly tripled in volume and the sugar is totally dissolved. (If you dip your finger in the egg/sugar mixture and rub two fingers together, you shouldn’t feel any sugary grit. Don’t rush this process if you want that pretty top!
What’s The Best Way To Cut Brownies Neatly? One trick is to chill the brownies before slicing. Cold brownies will cut much more evenly and neatly than warm brownies. Another trick is to use a plastic knife. Thirdly, wiping off the knife between slices will give you neater brownie squares.
Does Browning Butter Make A Difference? Yes! Browning butter makes a major difference in taste. The caramelization of the milk solids transforms the taste to more sweet and toffee-like. You simply can’t achieve the same flavor without it.
How Does Brown Sugar Affect Brownies? Brown sugar contains molasses which adds more moisture to the recipe. I find my brownies are much more moist (gross word, I know), and stay fudgy longer than using just white sugar.
Can You Freeze Gluten-Free Brownies? Absolutely! I love to freeze leftover brownies. They’ll stay neat and tidy if you freeze the whole pan of brownies. (Lift them out using your parchment paper “handles” and slide the cooled brownies on the parchment into a freezer bag. If you need to freeze individual slices, freeze them in a single layer or put parchment between layers so they don’t freeze in a big lump.


Recipe Card
Did you make this recipe?
Leave a star rating below when you try our Gluten-Free Brown Butter Brownies recipe! We can’t wait to hear how it goes!
Gluten-Free Brown Butter Brownies
Ingredients
- 1 stick butter (113 grams/8 Tablespoons)
- 1.5 cups chocolate chips or chopped chocolate (9 ounces/255 grams)
- 1 cup brown sugar (200 grams)
- 3 large eggs
- 1 teaspoon vanilla extract
- ½ teaspoon salt
- ⅓ cup unsweetened Dutch-processed cocoa powder (dark cocoa) (30 grams)
- ¾ cup gluten-free measure-for-measure flour (90 grams), scooped & leveled (We like King Arthur)
- ⅔ cup chocolate chips or chopped walnuts to mix in (or some flaky sea salt for garnish)
Instructions
- Preheat & Prep. To start, preheat oven temperature to 325 degrees F. Line a metal 8×8" baking pan with parchment paper.
- Brown Butter. Next, add the butter to a light-colored saucepan and cook over medium heat, stirring constantly, until the butter foams and the butter underneath the foam has deepened to a honey color and the butter smells sweet and fragrant.
- Melt Chocolate. Remove the butter from the heat and stir in the chocolate chips. Whisk until the chocolate is totally melted, smooth, and glossy. Let the chocolate cool a few minutes.
- Whip Eggs & Brown Sugar. While the chocolate cools, combine brown sugar and eggs in a medium glass bowl. Whisk until the mixture has lightened in color and roughly tripled in volume. This will take 3-5 minutes or so, though you can speed the process by using a hand mixer. The sugar should be completely dissolved–if you rub the mixture between your fingers, there shouldn't be any sugar crystals or grit.
- Combine Egg Mixture & Chocolate Mixture. When the eggs/sugar are lighter in color and totally dissolved, whisk the mixture into your cooled chocolate until well combined and incorporated.
- Finish Batter. Add vanilla, salt, cocoa powder, and gluten-free flour. Stir with a spatula, until the flour is just barely incorporated. If adding nuts or chocolate chips, fold them in with a spatula at this point.
- Bake Brownies. Pour the brownie batter into your prepared baking dish. Bake brownies at 325 degrees F. 22-25 minutes, or until the top is shiny and glossy, and a toothpick inserted in the center comes out with a little bit of mostly done batter. It shouldn't be liquid-y (under-baked) and shouldn't be dry (over-baked)
- Cool & Cut. Allow the brownies to cool at least 20-3o minutes before cutting into 12-16 pieces. Feel free to garnish with some flaky sea salt, if desired.
- Serve & Store. Enjoy right away or store leftover brownies in an airtight container at room temperature 2-3 days. Or, freeze up to 2 months.
Notes
- Gluten-Free Flour. We highly recommend King Arthur Measure-For-Measure Gluten-Free Flour Blend for these brownies. If you use another brand, make sure it contains xanthan gum. Be sure to weigh the flour for best results, or scoop flour into the measuring cup rather than scooping WITH the measuring cup to avoid packing extra flour into these brownies.
- A Tip To Cut Brownies Neatly: One trick is to chill the brownies before slicing. Cold brownies will cut much more evenly and neatly than warm brownies. Another trick is to use a plastic knife. Thirdly, wiping off the knife between slices will give you neater brownie squares.
Video
Find the recipe:
sweetsandthankyou.com/gluten-free-brown-butter-brownies/
Oh my holy heavens. These brownies. They are PERFECTION! Fudgy, soooo chocolatey, rich and dense. The brown butter flavor is brilliant! I cut the brown sugar down to 3/4 cup (we don’t like super sweet desserts). It was perfect!
AAAH! You totally made my day with this review! THANK YOU, THANK YOU, THANK YOU!
It’s our anniversary and I thought we needed a treat even though we’re home with colds. These were so easy to throw together! I love the shiny top and the fudgy flavor. And browning the butter was really quite easy and quick. I made as directed, except I use regular flour (and I didn’t add any additional chocolate or the salt). They’re perfect with a scoop of ice cream, too!
Robin – You are the QUEEN of nice comments! I appreciate you so much. I’m so glad these could help you celebrate a special day–happy anniversary!
OH MY GOD!!!!!
These brownies were delicious! I made them for Christmas and no one could even tell they were gluten-free
also, My favorite gluten-free flour is the KING ARTHUR MEASURE FOR MEASURE GLUTEN FREE FLOUR
have a merry Christmas! 10000 out of ten recommend you make these!
(can you tell I love em’)
GAH! You totally made my day with this review!!!
thank you for this recipe
will DEFINITELY be making it again!
I’m SO GLAD!
As a connoisseur of brownies I like to believe I have a discerning eye. I give these brownies top marks. These are fudgy in the most delightful way and the texture is perfect. Sometimes gluten free brownies can fall a bit flat, but that is far from the case here.