Gluten-Free Mini Cheesecakes
This post may contain affiliate links. See our disclosure policy for more.


These adorable gluten-free mini cheesecakes are a great way to bake cheesecake without a springform pan! They’re easy to make, with all the classic flavor you love, and pair beautifully with all your favorite toppings!


Everything You Love About Cheesecake, But Mini (AND EASIER!)
I LOVE a good classic cheesecake (Lemon, Oreo, Strawberry, Apple, Pumpkin–you name it!) but they are definitely a bit of a labor of love. This gluten-free mini cheesecake recipe simplifies the prep, but leaves you with the classic flavor and texture you love! No springform pan required!
🥣 EASIER, FASTER & CHEAPER! Since these cheesecakes are baked in a muffin pan, the bake time is less than half the time of full-sized cheesecakes! You’ll need less cream cheese & filling ingredients, which saves you time, energy and money!
🍪 FLAVORS: You’ll still get the classic, creamy, tangy flavor of classic cheesecake, and you can pair them with almost any topping you like! (We’ve got TONS of ideas!)
❄️ VERSATILE. These mini gluten-free cheesecakes are a favorite dessert for Easter brunch, Mother’s Day, birthday parties, potlucks, and all kinds of celebrations! You can make them all the same, mix and match toppings, or let guests top their own!
Happy baking! xo, Emily
Gather Your Ingredients
So what do we need to make gluten-free mini cheesecakes? Let’s take a look at our simple ingredients list:

How To Make Gluten-Free Mini Cheesecakes, Step By Step
As always, you can find the full recipe, with ingredient amounts, detailed instructions, and tips in the recipe card below.

BEFORE YOU START: Make sure you’re using ROOM TEMPERATURE ingredients (cream cheese, sour cream, and eggs). It makes a significant difference in how smooth your filling will get and how easily it will blend. Cold cream cheese will clump & be hard to blend.
- Preheat & Prep. To start, preheat oven temperature to 350 degrees F. Line a light colored metal muffin pan with 12 parchment paper muffin liners.
- Mix Up Graham Cracker Crust. In a medium bowl, combine gluten-free graham cracker crumbs, melted butter, and 2 Tablespoons granulated sugar. Stir until evenly blended.
- Divide & Pat Out Crust. Add a heaping tablespoon of the crumb mixture to each parchment paper cup and use the back of the tablespoon (or clean fingers) to gently pat down the crust into an even layer. It doesn’t need to be super compacted, but should look even and sealed around the edges.
- Pre-Bake Crust & Cool. Bake crust for 8 minutes and set the pan aside on a cooling rack to cool slightly while you mix up the filling.
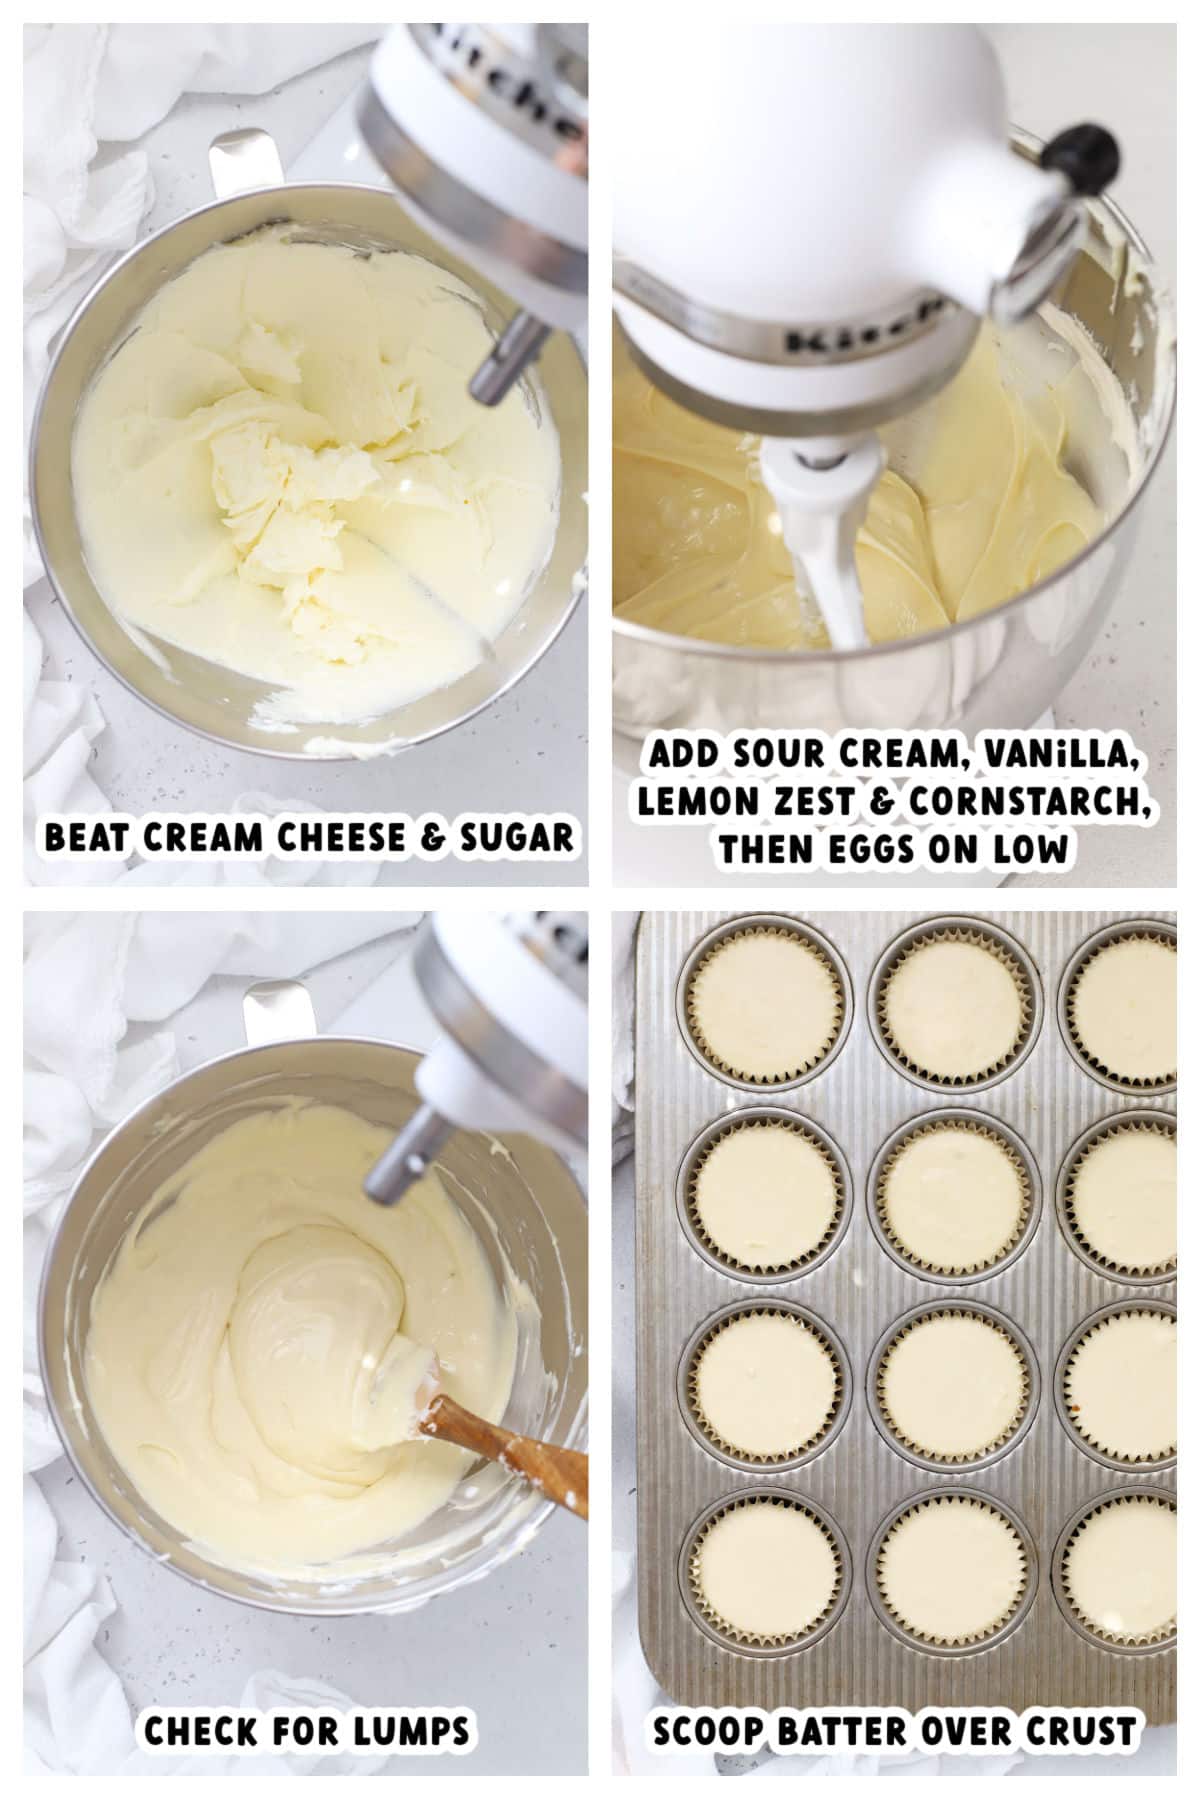
- Mix Cream Cheese & Sugar. In the bowl of a stand mixer (or a large bowl), beat softened cream cheese and 1/2 cup sugar on medium-low speed with the paddle attachment (or a hand mixer) 2-3 minutes, or until evenly blended and creamy.
- Finish The Filling. Scrape down the sides of the bowl and add sour cream, vanilla, lemon zest, and cornstarch. Mix on LOW speed just until blended, then add eggs 1 at a time on LOW speed until just mixed. (Try not to over-mix here, since incorporating extra air can cause the cheesecakes to sink later.)
- Add Filling To Crust. Spoon cheesecake batter over the graham cracker crusts (I like using a large cookie scoop for this!). Gently shake the pan or gently tap on the counter to remove any air bubbles.
- Make Hot Water Bath & Bake. Pour boiling water into a 9×13 metal or ceramic pan (I like to place mine on a cookie sheet for stability) and place on the rack underneath the center. Add muffin pan with the cheesecakes to the center rack above the water bath and bake 25-28 minutes or until just set. (A small wobble in the center is fine!) The cheesecakes will look slightly puffed at this point.
- Cool, Then Chill. Remove the muffin pan from the oven and let the cheesecakes cool at room temperature 45 minutes. Transfer pan to the fridge and chill uncovered at least 4 hours or until completely cold. Cheesecakes will settle as they chill, and will have a slight indent in the center, but shouldn’t look sunken!
- Serve & Store. Remove cheesecakes from the pan (I leave them wrapped in parchment paper wrapper for easy serving) and enjoy with your favorite toppings. Store leftover cheesecakes covered in the fridge 3-4 days or freeze in a single layer up to 2 months.

Make-Ahead Tips
These mini gluten-free cheesecakes are GREAT for making in advance for parties or celebrations. I like to make them the day before and store in them uncovered in the fridge for up to 24 hours. Or, you can freeze them in an freezer-safe airtight container or freezer-safe zip-top bag in a single layer for up to 2 months. Thaw frozen cheesecake in the fridge before serving.

Let’s Talk Toppings!
Part of what makes these gluten-free individual cheesecakes a great recipe for entertaining is that there are so many ways to top them! Make them all the same, or set out toppings and let guests top their own!

FAQ + Tricks For The Best Mini Cheesecakes
Your Pan Material Matters. I recommend a light-colored metal muffin tin with parchment paper liners for this. You MUST use liners, or the cheesecake won’t come out of the pan well. Other pan materials (like silicone or ceramic) conduct heat differently and can cause the cream cheese to “climb” the sides, which creates sinking.
Use The Right Cream Cheese. I ONLY recommend full-fat, brick-style cream cheese, like Philadelphia brand for this mini cheesecake recipe. Low-fat cream cheese or spreadable cream cheese in a tub will not work well. (It can separate, seep, or get lumpy.)
Use The Water Bath. If possible, I highly recommend the modified hot water bath here, since it creates steam that cooks them gently and gives the cheesecakes a uniform look. If you skip it, your cheesecakes may crack, sink, or brown around the edges.
Cool Then Chill. Another trick for preventing cracks or sinking is to cool the cheesecakes at room temperature about 45 min before transferring to the fridge to cool completely. This gentle transition of temperature helps protect the structure of the cheesecake. (We use this same trick for traditional cheesecake!)


🌟 Did You Make This Recipe?
Tell me all about it! Leave a star rating below when you try our gluten-free Mini Cheesecakes recipe. I can’t wait to hear how it goes!
Gluten-Free Mini Cheesecakes
Ingredients
For The Gluten-Free Graham Cracker Crust
- 1 cup Gluten-Free Graham Cracker Crumbs,* like Pamela's or Schar (120 grams)
- 2 Tablespoons Melted Butter (28 grams)
- 2 Tablespoons Granulated Sugar (25 grams)
For The Cheesecake Filling
- 16 ounces Full-Fat Cream Cheese, like Philadelphia – ROOM TEMPERATURE!
- ½ cup Granulated Sugar (100 grams)
- ⅓ cup Sour Cream – ROOM TEMPERATURE
- 1 ½ teaspoons Vanilla Extract
- 1 teaspoon Fresh Lemon Zest
- 1 teaspoon Cornstarch
- 2 Large Eggs – ROOM TEMPERATURE
Optional Toppings
- Strawberries or Strawberry Topping
- Fresh Raspberries + Raspberry Sauce
- Cherry Pie Filling
- Chocolate Syrup + Crushed Gluten-Free Oreos
- Lemon Curd + Lemon Slices or Whipped Cream
- Blueberry Topping + Fresh Blueberries + Gluten-Free Graham Cracker Crumbs
- Caramel Sauce + Flaky Sea Salt
- Cinnamon Apples
- Toasted Pecans + Caramel Sauce
- Mixed Berries + Whipped Cream
Instructions
- Preheat & Prep. To start, preheat oven temperature to 350 degrees F. Line a light colored metal muffin pan with 12 parchment paper liners. Start boiling a pan of water to use for the modified hot water bath later.
- Mix Crust. In a medium bowl, combine gluten-free graham cracker crumbs, melted butter, and 2 Tablespoons granulated sugar. Stir until evenly blended.
- Divide & Pat Out Crust. Add a heaping tablespoon of the crust mixture to each parchment paper cup and use the back of the tablespoon (or clean fingers) to gently pat down the crust. It doesn't need to be super compacted, but should look even and sealed around the edges.
- Pre-Bake Crust & Cool. Bake crust for 8 minutes and set the pan aside to cool slightly while you mix up the filling.
- Mix Cream Cheese & Sugar. In the bowl of a stand mixer (or a large mixing bowl), beat softened cream cheese and granulated sugar on medium-low speed with the paddle attachment (or a hand mixer) 2-3 minutes, or until evenly blended and creamy.
- Finish The Filling. Scrape down the sides of the bowl and add sour cream, vanilla, lemon zest, and cornstarch. Mix on LOW speed just until blended, then add eggs 1 at a time on LOW speed until just mixed. (Try not to over-mix here, since incorporating extra air can cause the cheesecakes to sink later.)
- Add Filling To Crust. Spoon or pour cheesecake batter over the graham cracker crusts (it's ok if the crust is still slightly warm!). Gently shake the pan or gently tap on the counter to remove any air bubbles.
- Make Hot Water Bath & Bake. Pour boiling water into a 9×13 metal or ceramic pan (I like to place mine on a cookie sheet for stability) and place on the rack underneath the center. Add muffin pan with the cheesecakes to the center rack above the water bath and bake 25-28 minutes or until just set. (A small wobble in the center is fine!) The cheesecakes will look slightly puffed at this point.
- Cool, Then Chill. Remove the muffin pan from the oven and let the cheesecakes cool at room temperature 45 minutes. Transfer pan to the fridge and chill uncovered at least 4 hours or until completely cold. Cheesecakes will settle as they chill, and will have a slight indent in the center, but shouldn't look sunken!
- Serve & Store. Remove cheesecakes from the pan (I leave them wrapped in parchment paper wrapper for easy serving) and enjoy with your favorite toppings. Store leftover cheesecakes covered in the fridge 3-4 days or freeze without toppings in a single layer up to 2 months. For best results, store the cheesecakes without toppings.
Notes
- Gluten-Free Graham Crackers. Regular graham crackers are NOT gluten-free, so make sure to only use certified gluten-free graham crackers for this recipe. I like Pamela’s and Schar brands best!
- Room Temperature Ingredients. Make sure you’re using ROOM TEMPERATURE cream cheese, sour cream, and eggs! It makes a significant difference in how smooth your filling will get and how easily it will blend.
- Use The Right Cream Cheese. I ONLY recommend full-fat, brick-style cream cheese, like Philadelphia brand for this mini cheesecake recipe. Low-fat cream cheese or spreadable cream cheese in a tub will not work well. (It can separate, seep, or get lumpy.)
- Your Pan Material Matters. I recommend a light-colored metal muffin tin with parchment paper liners for this. You MUST use liners, or the cheesecake won’t come out of the pan well. Other pan materials (like silicone or ceramic) conduct heat differently and can cause the cream cheese to “climb” the sides, which creates sinking.
Video
Find the recipe:
sweetsandthankyou.com/gluten-free-mini-cheesecakes/
So many great ideas! Not only are these delicious but they look so impressive and cute! I can see these being a hit at a get-together.