Gluten-Free Lemon Bundt Cake
This post may contain affiliate links. See our disclosure policy for more.


This gluten-free lemon bundt cake recipe is bursting with fresh lemon flavor and a soft, fluffy texture you’re going to LOVE. It’s the perfect cake for lemon lovers!

I’ll just say it: a lot of gluten-free cake recipes are…lackluster.
Many are dense, dry, or crumbly. Many lack great flavor.
This one doesn’t.
Our gluten-free lemon bundt cake is soft, fluffy, and BURSTING with bright lemon flavor. It’s gloriously moist (even on the second day!!!), and looks as impressive as it tastes. It’s perfect for a celebration big or small–afternoon tea, birthdays, Mother’s Day, Easter, graduation parties… it’s lovely for all of them!
Best of all, the ingredient list isn’t fancy or complicated.
Here’s what you need to make our easy gluten-free lemon bundt cake recipe…

Gather Your Ingredients
Dry Ingredients
- Gluten-Free Measure-For-Measure Flour. We love and recommend this gluten-free flour blend from King Arthur. If you use another blend, be sure it contains xanthan gum or your cake won’t turn out!
- Cornstarch. Adding a bit of cornstarch to the dry ingredients lightens the texture and mimics the effect of cake flour. It adds that stretchy spring that makes this cake so lovely.
- Baking Powder & Baking Soda. We use a mix for the best puff and to react with the acidity of the lemon juice and sour cream.
- Kosher Salt. To balance & elevate the other flavors.
Wet Ingredients
- Softened Butter. Make sure your butter is properly softened before you cream it. It should be soft enough to show an indent from your finger when pressed, but shouldn’t be shiny or greasy-looking (that’s too warm!)
- Sugar. Regular granulated sugar (white sugar) does the job for this lemon cake!
- Fresh Lemons. You’ll need both the fresh lemon zest and fresh lemon juice for our gluten-free lemon bundt cake. The zest adds the most vibrant lemon flavor since it’s packed with lemon essential oils. Don’t skimp on it!
- Room Temperature Eggs. It’s important to use room temperature eggs since you’re creaming the butter and sugar together. Using cold butter can cause the butter to seize,
- A Few Extracts. To round out the flavor, I like to use a combination of vanilla extract, almond extract, and lemon oil or lemon extract. This trio adds incredible flavor and makes the lemon in the cake taste even more lemony.
- Room Temperature Sour Cream. The tang keeps the flavor light while the fat keeps the texture gorgeously soft and tender.
- Room Temperature Milk. Then, you’ll need a little milk. The higher the fat percentage, the better the texture of the cake.
Two Extra Layers Of Flavor
- A Simple Lemon Syrup. Brushing the cake with lemon simple syrup LOCKS in moisture and adds and extra layer of lemon flavor. All you need is fresh lemon juice and sugar!
- A Quick Lemon Glaze. Then, we’ll finish the cake with an easy lemon glaze made from powdered sugar, milk or lemon juice, and a tiny bit of vanilla.
How To Make Gluten-Free Lemon Bundt Cake, Step By Step
As always, you can find the full recipe, with ingredient amounts, detailed instructions, and tips in the recipe card below.

Start By Making The Cake
- Preheat The Oven to 350 degrees F. Set aside your bundt pan, oil/spray oil, and 2 Tablespoons sugar for greasing the pan later. (Don’t prep the pan now, just have everything ready)
- Combine The Dry Ingredients. In a medium bowl, combine gluten-free flour blend, cornstarch, baking powder, baking soda, and salt. Whisk to combine and set the dry ingredients aside.
- Rub Lemon Zest Into The Sugar. Zest the lemons (measuring a full 1/4 cup!), and place the zest in the bowl of a stand mixer with the sugar. (You can also use a handheld electric mixer and a large bowl) Use your fingertips to rub the zest into the sugar. It should smell fragrant and the sugar should be moist and slightly yellow from the zest.
- Squeeze Lemon Juice Into The Milk. Then, squeeze 1/4 cup lemon juice and add it to the milk. Whisk to combine and set aside. (This mixture will start to thicken and curdle a bit–this is normal!)
- Cream Butter & Sugar. Add the softened butter to the mixer with the lemon sugar and cream 2-3 minutes on medium speed until light and fluffy.
- Add Eggs, One At A Time to the mixer, beating to incorporate each egg before adding the next one.
- Mix In The Sour Cream & Flavorings. Add sour cream, vanilla extract, almond extract, and lemon oil/lemon extract to the mixer. Mix until combined.
- Alternate Dry Ingredients & Milk. Then, add half of the dry ingredients. Quickly pulse the mixer to combine a bit (this helps avoid the dry ingredients poofing out!), then mix until almost fully incorporated. Add half of the milk/lemon juice mixture and mix to combine. Scrape down the edges and repeat, adding the second half of the dry ingredients, mixing until almost incorporated, then pouring in the second half of the milk mixture and mixing till just combined.
- Prep Your Pan. Working quickly, spray or brush the bundt pan well with oil, making sure to get all of the curves, dips, and indents, and the center tube. Sprinkle 2 Tablespoons of sugar into the pan evenly then tap the sides of the pan to distribute the sugar. Tap out any excess sugar by turning the pan upside down to let excess sugar fall out.
- Pour The Batter Into The Prepared Pan and smooth into an even layer.
- Bake The Cake for 45-55 minutes (the exact time will be different based on your pan materials, shape, and size). The top should spring back when gently pressed, and a toothpick inserted in the center of the cake should come out clean with just a few moist crumbs. If you have an instant-read thermometer, the center of the cake should be between 200-210 degrees.
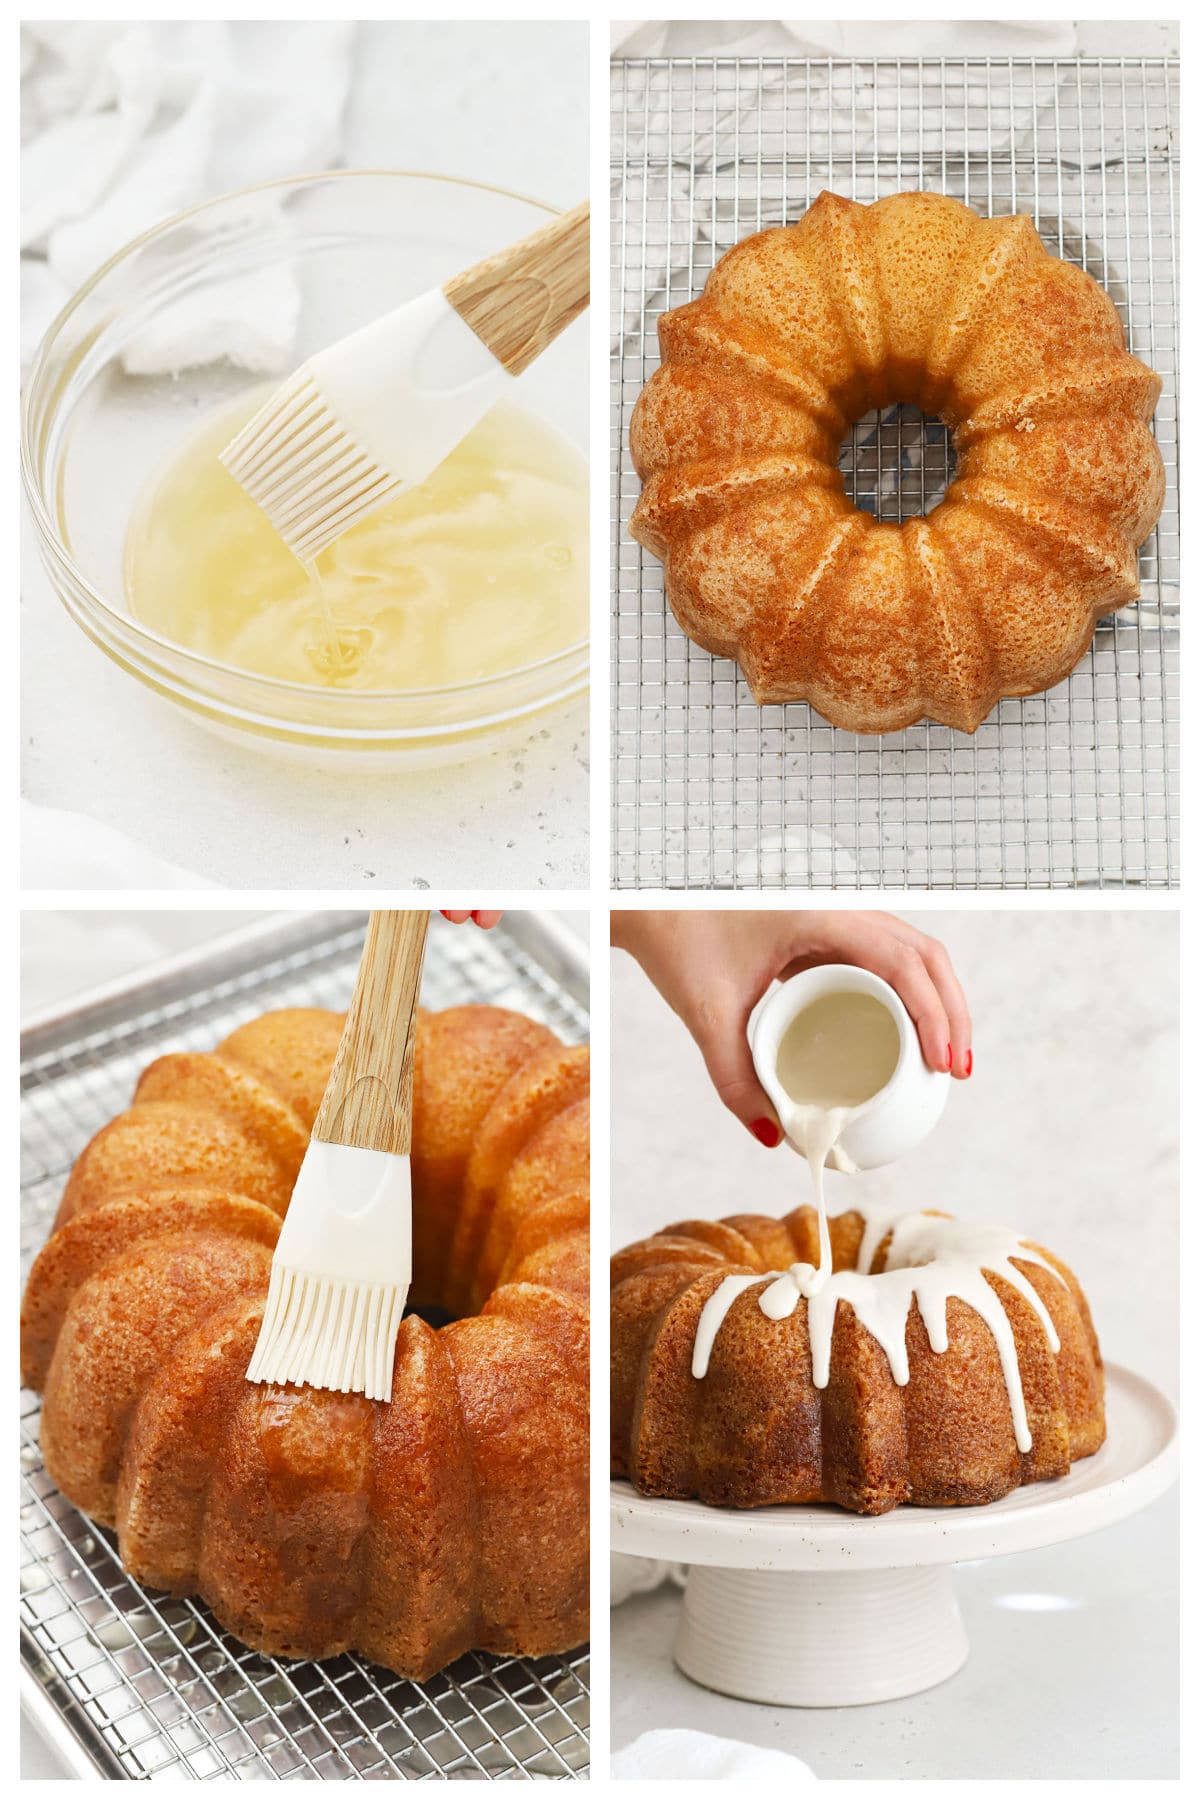
Finish The Cake With Lemon Syrup & Glaze
- While The Cake Bakes, Mix Your Lemon Syrup. In a small microwave-safe bowl, combine 1/2 cup sugar and 1/2 cup lemon juice. Whisk to combine, then microwave in 20-30 second increments, stirring in between each interval, until the sugar is fully dissolved.
- Let The Cake Cool 10 Minutes before turning out onto a wire rack to finish cooling. (I put the cooling rack on top of the cake in the pan like a lid, then use oven mitts to flip the cake and rack upside down so that the rack is now on the bottom and the cake can fall out onto the rack.
- Brush With Lemon Syrup. Right after you turn the cake out of the pan, brush the cake with lemon syrup, doing your best to evenly brush it around the sides cake and into the center. (It’ll seem like way too much, but it soaks in and locks moisture into that cake–use it all!)
- Cool The Cake COMPLETELY, Then Glaze. Once the cake is completely, totally cool (not even a little warm!), you can mix up your glaze. Combine powdered sugar, 2 Tablespoons milk, 1 Tablespoon lemon juice, and 1/2 teaspoon of vanilla. Whisk to combine until it becomes a very thick glaze. (Mix for 1-2 minutes before adding any additional liquid, then only add 1/2 teaspoon at a time, until you reach a thick but pourable consistency.) Drizzle the glaze over the cooled cake and let it set before slicing.
Look For Sensory Clues
Different shapes and sizes of pans will bake differently, so while I’ve given you a range of time for baking this cake, your exact oven, humidity, elevation, pan materials, and pan shape can all impact the bake time. Look for sensory clues that your cake is done:
- COLOR. The cake should be golden brown, and even in color.
- SPRING. It should spring back when gently pressed with your fingers and shouldn’t look sloshy or wobbly when gently shaken.
- SIDES. The cake should be starting to pull away from the sides
- TOOTHPICK TEST. If you insert a toothpick, skewer, or cake tester in the center of the cake, it should come away mostly clean with just a few moist crumbs. (No gooey batter allowed!)
- TEMPERATURE. If you take the temperature of the center of your cake, an instant read thermometer should read 200-210 degrees F in the center of the cake. (I usually test 3-4 spots around the center of the bundt to make sure it’s evenly baked)

2 Tricks For Working With Bundt Pans
Baking a gluten-free bundt cake isn’t much trickier than baking any other cake, but there are a few tricks that can help you get the best results with your bundt cakes:
1. Choose The Right Size, Shape & Material
- SIZE. You’ll need a 10-12 cup bundt pan for our gluten-free lemon bundt cake. If you use a smaller size, the cake will overflow. Not good!
- SHAPE. Next, for shape–the more intricate the shape of your bundt pan, the more likely it is to stick to the cake. If you’re a beginner or just want something reliable, I recommend a classic, simple design like this one (pictured!) or this one.
- MATERIALS. Choose an aluminum pan, when you can. Light-colored aluminum pans conduct heat more evenly and gently than dark pans or ceramic pans.
2. Prep Your Pan Properly
Properly greasing a bundt cake pan is KEY if you want it to release from the pan well at the end. We wrote a whole post about how to grease a bundt pan, including all our best tips and tricks. I highly recommend giving it a quick read so you’re properly prepped!

FAQ + Tips And Tricks For The Best Gluten-Free Bundt Cake
Use Room Temperature Ingredients! This isn’t just for show, there’s an actual reason! If you use cold butter, the butter and sugar won’t cream properly. Then, if you add cold eggs, sour cream, or milk, they’ll cause the butter to seize, which can make your batter curdle. Set the ingredients out 45-60 minutes in advance to let them come to room temperature. (Or closer to 90 minutes, if your room is cold!)
Zest FIRST, Then Juice The Lemons. Make sure you zest your lemons BEFORE you juice them. It’ll be much easier and safer, and make it easier to get the juice out later. We love this microplane zester & this inexpensive lemon squeezer (it’s a GAME-CHANGER!!!).
Grease Your Bundt Pan Properly. Don’t grease the bundt pan until right before baking. Grease well with oil (or 100% spray oil–NOT baking spray!), then sprinkle with sugar and tap the pan to distribute it evenly. Quickly fill the pan with batter and bake as directed. Check out this post about How To Grease A Bundt Pan for even more tips and techniques!
Measure The Flour Carefully. Especially when you’re baking cakes, measuring flour carefully can make or break the texture. If possible, weigh the flour on a scale. If you don’t have one, be sure to use the scoop and level method to get an accurate a measurement as possible.
More Toppings To Try. Not a glaze person? No worries! Skip the lemon glaze and dollop slices with whipped cream and garnish with fresh berries. I love a mix of blueberries, strawberries, and raspberries for extra color!


🌟 Did You Make This Recipe?
Tell me all about it! Leave a star rating below when you try our Gluten-Free Lemon Bundt Cake recipe. I can’t wait to hear how it goes!

Gluten-Free Lemon Bundt cake
Ingredients
For The Lemon Cake:
- 3 cups gluten-free measure-for-measure flour, weighed or scooped & leveled (360 grams)
- ¼ cup cornstarch (32 grams)
- 2 ¼ teaspoons baking powder
- ½ teaspoon baking soda
- ¾ teaspoon kosher salt
- 1 cup butter softened (2 sticks, 8 oz.)
- 2 ½ cups sugar (500 grams)
- ¼ cup fresh lemon zest
- 5 large eggs room temperature
- 1 teaspoon vanilla extract
- ½ teaspoon almond extract
- ¼ teaspoon lemon oil or 1/2 teaspoon lemon extract
- 1 cup sour cream
- ½ cup milk
- ¼ cup fresh lemon juice
To Grease The Bundt Pan:
- 100% spray oil only ingredient is oil or oil + a pastry brush (NOT baking spray)
- 2-3 Tablespoons sugar
For The Lemon Simple Syrup
- ⅓ cup fresh lemon juice
- ½ cup sugar
For The Lemon Glaze:
- 1 ½ cups powdered sugar (180 grams)
- 1 Tablespoon milk
- 1-2 Tablespoons fresh lemon juice
- ¼ teaspoon vanilla extract
Instructions
Start By Making The Cake:
- Preheat The Oven to 350 degrees F. Set aside your bundt pan, oil/spray oil, and 2 Tablespoons sugar for greasing the pan later. (Don’t prep the pan now, just have everything ready)
- Combine The Dry Ingredients. In a medium bowl, combine gluten-free flour blend, cornstarch, baking powder, baking soda, and salt. Whisk to combine and set the dry ingredients aside.
- Rub Lemon Zest Into The Sugar. Zest the lemons (measuring a full 1/4 cup!), and place the zest in the bowl of a stand mixer with the sugar. Use your fingertips to rub the zest into the sugar. It should smell fragrant and the sugar should be moist and slightly yellow from the zest.
- Squeeze Lemon Juice Into The Milk. Then, squeeze 1/4 cup lemon juice and add it to the milk. Whisk to combine and set aside. (This mixture will start to thicken and curdle a bit–this is normal!)
- Cream Butter & Sugar. Add the softened butter to the mixer with the lemon sugar and cream 2-3 minutes on medium speed until light and fluffy.
- Add Eggs, One At A Time to the mixer, beating to incorporate each egg before adding the next one.
- Mix In The Sour Cream & Flavorings. Add sour cream, vanilla extract, almond extract, and lemon oil/lemon extract to the mixer. Mix until combined.
- Alternate Dry Ingredients & Milk. Then, add half of the dry ingredients. Quickly pulse the mixer to combine a bit (this helps avoid the dry ingredients poofing out!), then mix until almost fully incorporated. Add half of the milk/lemon juice mixture and mix to combine. Scrape down the edges and repeat, adding the second half of the dry ingredients, mixing until almost incorporated, then pouring in the second half of the milk mixture and mixing till just combined.
- Prep Your Pan. Working quickly, spray or brush the bundt pan well with oil, making sure to get all of the curves, dips, and indents, and the center tube. Sprinkle 2 Tablespoons of sugar into the pan evenly then tap the sides of the pan to distribute the sugar. Tap out any excess sugar by turning the pan upside down to let excess sugar fall out.
- Pour The Batter Into The Prepared Pan and smooth into an even layer.
- Bake The Cake for 45-55 minutes (the exact time will be different based on your pan materials, shape, and size). The top should spring back when gently pressed, and a toothpick inserted in the center of the cake should come out clean with just a few moist crumbs. If you have an instant-read thermometer, the center of the cake should be between 200-210 degrees.
Mix Up The Lemon Syrup & Brush The Cake:
- While The Cake Bakes, Mix Your Lemon Syrup. In a small microwave-safe bowl, combine 1/2 cup sugar and 1/3 cup lemon juice. Whisk to combine, then microwave in 20-30 second increments, stirring in between each interval, until the sugar is fully dissolved.
- Let The Cake Cool 10 Minutes before turning out onto a wire rack to finish cooling. (I put the cooling rack on top of the cake in the pan like a lid, then use oven mitts to flip the cake and rack upside down so that the rack is now on the bottom and the cake can fall out onto the rack.
- Brush With Lemon Syrup. Right after you turn the cake out of the pan, brush the cake with lemon syrup, doing your best to evenly brush it around the sides cake and into the center. (It’ll seem like way too much, but it soaks in and locks moisture into that cake–use it all!)
Cool The Cake COMPLETELY, Then Make The Glaze:
- Once the cake is completely, totally cool (not even a little warm!), you can mix up your glaze.
- Combine powdered sugar, 2 Tablespoons milk, 1 Tablespoon lemon juice, and 1/2 teaspoon of vanilla.
- Whisk to combine until it becomes a very thick glaze. (Mix for 1-2 minutes before adding any additional liquid, then only add 1/2 teaspoon at a time, until you reach a very thick but pourable consistency.)
- Pour the glaze over the cooled cake and let it set before slicing with a knife.
- Store. This cake will keep covered at room temperature 2-3 days, or you can wrap slices in plastic wrap and place them in an airtight container or freezer bag in the freezer up to 1 month.
Notes
- COLOR. The cake should be golden brown, and even in color.
- SPRING. It should spring back when gently pressed with your fingers and shouldn’t look sloshy or wobbly when gently shaken.
- SIDES. The cake should be starting to pull away from the sides. (If it’s fully pulled away from the sides, it’s likely over-done)
- TOOTHPICK TEST. If you insert a toothpick, skewer, or cake tester, it should come away mostly clean with just a few moist crumbs. (No gooey batter allowed!)
- TEMPERATURE. If you take the temperature of the center of your cake, an instant read thermometer should read 200-210 degrees F in the center of the cake. (I usually test 3-4 spots around the center of the bundt to make sure it’s evenly baked)
Video
Find the recipe:
sweetsandthankyou.com/gluten-free-lemon-bundt-cake/WE ♥

I made this cake in April for a family Easter dinner and when I went back to it today to make it again I noticed there weren’t any reviews…which I thought was strange because this cake is “delish”!! It’s very moist with lots of lemon flavour…SO GOOD and enjoyed by all the lemon lovers in our family. (“You can’t tell it’s gluten free” is a great comment to hear as a baker!)
You completely and totally made my day with this review!!! I appreciate you SO MUCH for taking the time to leave such a thoughtful review. Thank you, thank you, thank you!
This turned out AMAZING!! My GF friends were RAVING how moist, fluffy, sweet and tart this cake was. Definitely recommend this recipe.
This review totally made my day Mariela! THANK YOU so much for taking the time to share!
Amazing!! I’ll admit I was hesitant on GF before my husband was diagnosed with celiac but this recipe is WOW!! We didn’t need the glaze, it was delicious. Keeping this one in the recipe box!
AH! You totally made my day!!!
This is a delicious cake! I didn’t make the frosting but made whipped cream and served it with blueberries. Oh so good.! Definitely will make this agaiN!
YUM! I bet that was a delightful combination!
This is so fluffy and the lemon really comes through beautifully.
FIVE STARS!!!
For some reason my phone would only allow me to rate it four stars but I would give it 10 stars if I could. I’ve made this Bundt cake multiple times because my family loves it and requests it often. Thank you for this wonderful recipe.
I’m so glad it was a win for you Cyndy! Your review totally made my day!