How To Make Low Sugar Raspberry Freezer Jam
This post may contain affiliate links. See our disclosure policy for more.


This homemade raspberry freezer jam recipe is the EASIEST raspberry jam recipe around! Made with just 4 ingredients (no canning required!), it tastes just like sweet, ripe raspberries!

Remember how everyone in 2020 got into baking bread? I got into making freezer jam–raspberry, strawberry jam, peach jam, spiced pear, you name it.
I’d always been intimidated, but the extra time at home (and an abundance of comfort carbs) inspired me to finally give it a try. I HAD BEEN MISSING OUT!
Freezer jam has the best flavor, and learning how to make raspberry freezer jam is WAY EASIER THAN YOU THINK! It’s the EASIEST homemade raspberry jam to make. Unlike traditional jam, you don’t need any fancy equipment other than jars–there’s no canning or hot water baths or pressure canning to worry about!
Even if you’ve never made a batch of jam before, you can make this easy recipe.
This bright, easy raspberry freezer jam recipe is as simple as can be, and I’m here to take the mystery (and fear!) out of making your own homemade jam.
Gather Your ingredients
Let’s get started! Here’s what you need to make our low sugar raspberry freezer jam…(don’t worry, it still has all the sweet, fresh fruit flavor you’re looking for!)

- Fresh Or Frozen Raspberries. You can use either fresh raspberries OR frozen raspberries to make raspberry freezer jam, which means it’s easy to make a batch all year long. The big thing to keep in mind is that your jam will only taste as good as your berries, so do a little taste check to make sure the ones you bought taste great before making jam.
- Sugar. It’s going to seem like a lot of sugar for a low sugar raspberry jam recipe, but TRUST ME. The sugar is there for flavor, yes, but more importantly, it’s essential to the consistency. You cannot reduce the sugar in this recipe or it will not set up properly. (To put it in perspective, traditional raspberry freezer jam uses 5-6 cups of sugar compared to our 3 1/2 cups in this reduced sugar raspberry jam recipe.)
- Low-Sugar Pectin. I always use Sure Jell Low Sugar or No Sugar Recipe Pectin (currently sold in the PINK BOX). Make sure the pectin you’re buying is for low sugar or no sugar recipes or it won’t work properly with this recipe.
- Water. Lastly is some water. You’ll only need 1 cup of water for this jam recipe, to help dissolve the sugar and pectin.
- Jars & Lids! Then, you just need something to put it in. You can use plastic jars or glass jars, so long as they’re freezer-safe. We like 4 oz. jars and 8 oz. jars, as they’re about the amount of jam we can get through in a week. If you’ve got a larger family or want to make some as a gift, feel free to use larger or smaller jars!
USE EXACT AMOUNTS! Freezer jam isn’t difficult, but it IS precise. Do not cut down on the sugar, or the recipe will not set up properly. Measure the crushed fruit, sugar, and water as precisely as possible for the best results.

Freezer Jam Tips & Tricks To Know Before You Start
Homemade freezer jam isn’t difficult but it IS precise. If this is your first time making freezer jam, be sure to read through all the instructions first so you’re ready to dive in and move quickly once you get started. Here are the most important things to keep in mind when making raspberry freezer jam:
- MEASURE CAREFULLY! Again, no reducing or playing with the amounts of ingredients. Use exactly the amounts of mashed fruit, sugar, pectin, and water in the recipe.
- USE THE RIGHT PECTIN. You want low sugar pectin for this recipe. We like the pink box Sure Jell pectin. (The yellow box will not work here!)
- USE CLEAN JARS. Since we’re not canning, you don’t need to be quite as fussy about all the sterilization processes, but you DO need to use squeaky clean jars and lids. Feel free to use glass or plastic jars, just get them as clean and dry as possible before using.
- HAVE EVERYTHING MEASURED & PREPPED. Once you get started, things move rather quickly, so it’ll work smoothly and easily if you have everything ready to go. Measure all the ingredients and have your jars and lids close by so you can easily add ingredients and transfer the jam to jars as quickly as possible.
- WATCH THE CLOCK. Now is NOT the time to multitask! The pectin, sugar, and water boil for ONE minute, and you stir the raspberries into the pectin mixture for ONE minute. After that, you need to get the jam into jars as quickly as you can, so keep an eye on your pot and an eye on a watch or timer.
- LET IT REST. You’ll need to let the jam set at room temperature for 24 hours before transferring it to the freezer. (This is safe, as long as you’ve used clean jars!)
How To Make Raspberry Freezer Jam, Step By Step
As always, you can find the full recipe, with ingredient amounts, detailed instructions, and tips in the recipe card below.
- Clean & Dry Your Jars. Before you start, make sure your jars and lids are very clean and completely dry. Set them close to your work station so you can easily fill them when the jam is done.
- Prep Your Station. Gather a ladle or spoon and a funnel, if using, to help you pour the finished jam into jars. Set them next to the clean jars, along with a damp washcloth to help you clean up any messes.
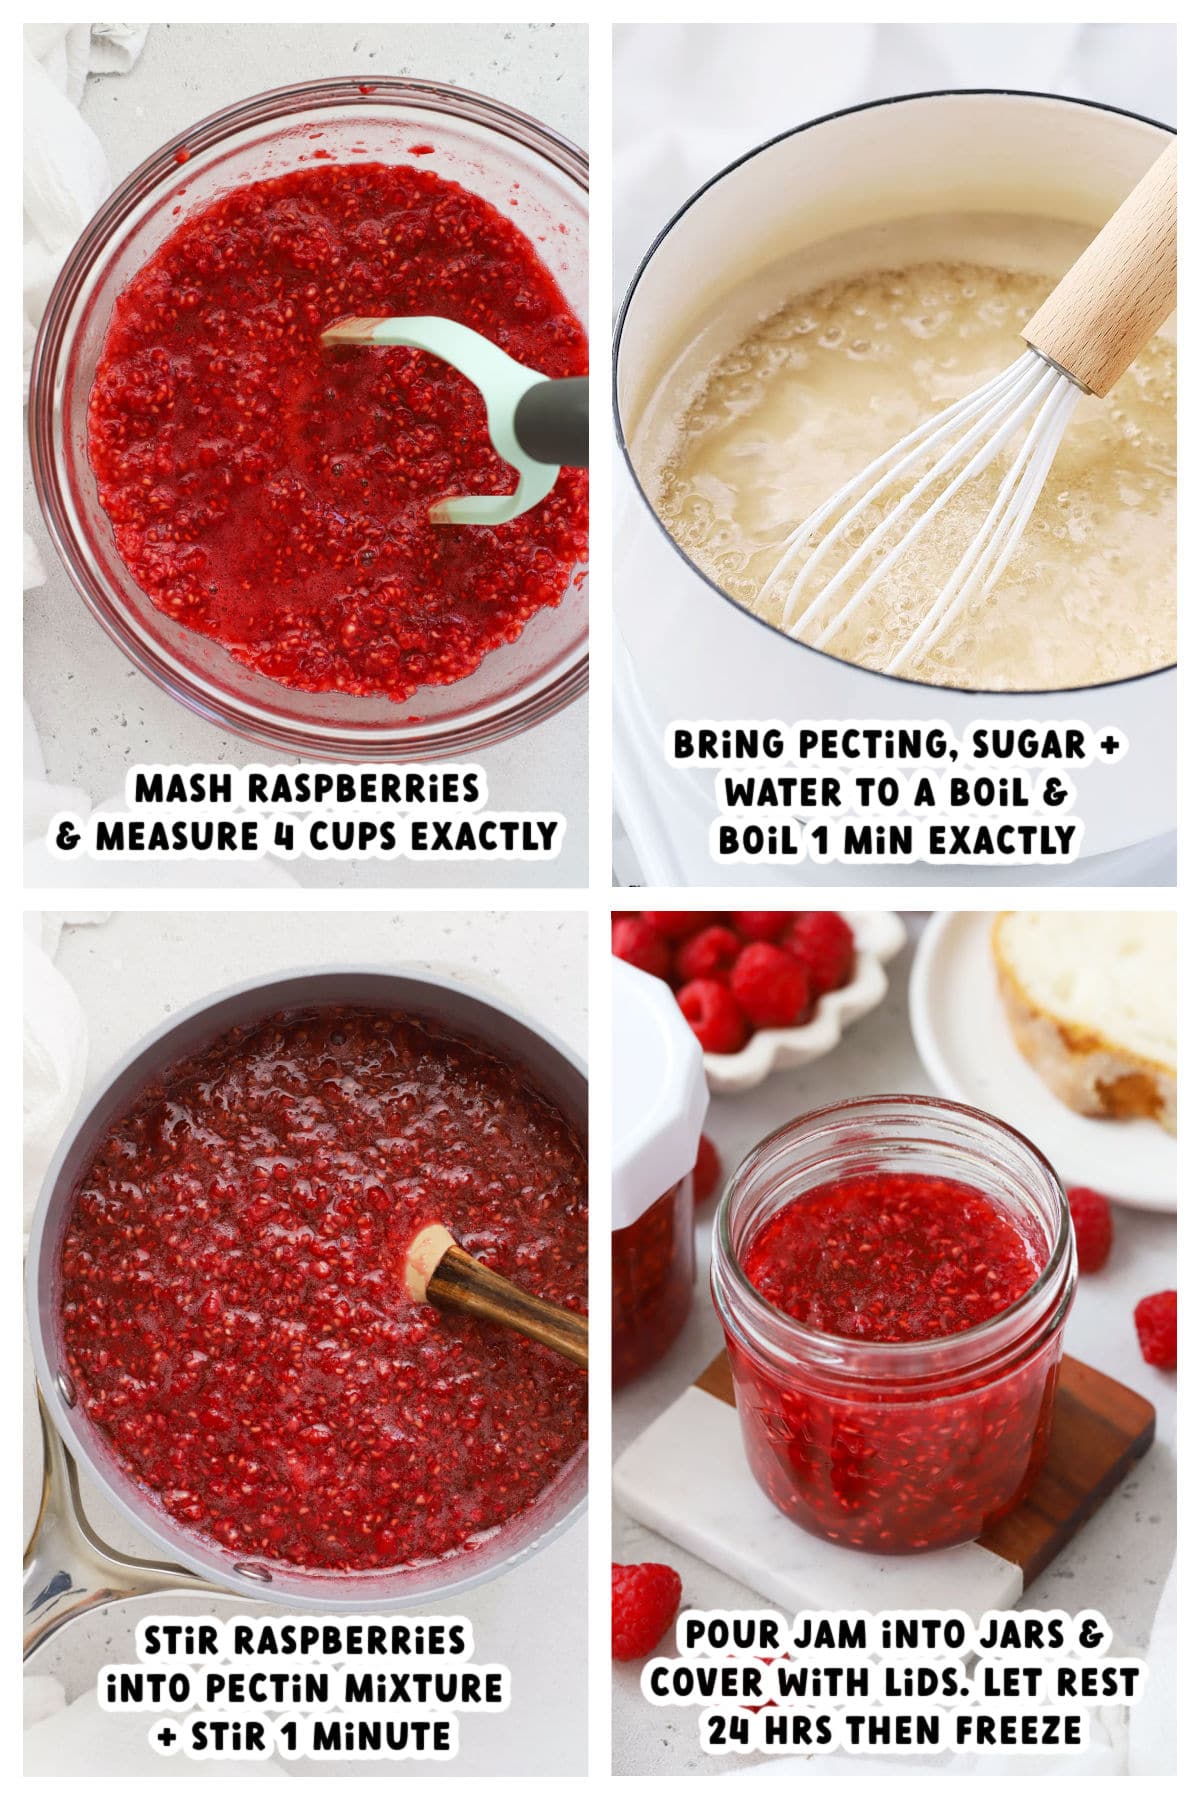
- Mash & Measure The Raspberries. Next, use a potato masher (best) or fork to crush berries in a large bowl. I find raspberry freezer jam sets up best when I don’t have any large clumps or chunks, so you want the mixture fairly uniform. Measure the mashed raspberries to make sure you have EXACTLY 4 cups. (No more, no less.)
- Measure Remaining Ingredients. Then, measure exactly 3 1/2 cups sugar, set aside one box of pectin for low-sugar and no-sugar recipes, and exactly 1 cup of water.
- Boil Sugar & Pectin Mixture. In a large saucepan, combine sugar, pectin, and water. Whisk constantly over medium-high heat to bring to a boil. Boil exactly 1 minute once the mixture is truly boiling (bubbles all across the surface, not just some here or there).
- Remove From Heat & Stir In Fruit. After 1 minute of boiling, remove the pan from the heat and immediately add the mashed raspberry mixture. Whisk or stir for 1 minute to combine completely.
- Pour Into Jars & Cover. As quickly as you can, spoon or pour the jam into your clean jars, leaving 1/2-1 inch of space at the top of each jar to allow for expansion in the freezer. Wipe up any spills around the rim or sides, then cover tightly with a lid. Repeat until all the jam is in jars.
- Let Jam Rest 24 Hours At Room Temperature. Allow the jars to sit at room temperature for 24 hours to set up. After 24 hours, you’ll be able to tell if your jam set properly. It shouldn’t slosh if you tilt the jar side to side. Instead, it should move slowly when tilted or not at all.
- Freeze Jam. Transfer the jars to the freezer and freeze up to 1 year. Thaw jars in the refrigerator when you’re ready to use. Open jam should be stored in the refrigerator up to 3 weeks.
ENJOY IT! Try this homemade freezer raspberry jam on toast, biscuits, waffles, pancakes, sandwiches, yogurt, oatmeal, English muffins, trifle, cake, desserts, and more!

FAQ For The Best Raspberry Freezer Jam
How Long Does Freezer Jam Last? Raspberry freezer jam will stay fresh in the fridge up to 3 weeks, or in the freezer up to 1 year.
Can I Use Something Besides Pectin? Not for this recipe. You must use pectin for low sugar, less sugar, or no sugar recipes–no substitutes! I recommend Sure Jell pink box pectin. Similarly, you can’t reduce the amount of sugar or use other sweetener here without impacting the recipe.
What Kind Of Jars Work For Freezer Jam? You can literally use any size or shape jar! It just needs to be freezer safe. Half pint jars (8 oz.) or 4 oz. jars work best for us. We love these glass jars or these plastic jars, but we’ve used all different sizes, shapes, and brands over the years. Make sure to save 1/2-1 inch of room at the tops of each jar to allow for expansion in the freezer.
Do You Store Freezer Jam At Room Temperature? Freezer jam is NOT shelf stable. After the initial 24 hours at room temperature to set, freezer jam must be frozen or refrigerated to stay food safe.
Can You Make Freezer Jam With Frozen Fruit? Yes! Frozen fruit is picked at its peak and flash frozen, which helps them retain their fresh flavor and their nutrients. Keep in mind that you’ll need to thaw the fruit before making freezer jam, and that jam made with thawed berries will be slightly softer set than jam made with fresh berries.
Why Didn’t My Freezer Jam Set Up? The two most common reasons are that you either didn’t measure carefully (the fruit, sugar, water, and pectin must all be exact) or didn’t boil the pectin mixture long enough. You can still use un-set freezer jam as more of a fruit sauce on oatmeal, ice cream. cheesecake, etc., or most packages of pectin have troubleshooting directions in their instructions. (Sure Jell has you boil additional pectin, water, and sugar, to mix in)


🌟 Did You Make This Recipe?
Tell me all about it! Leave a star rating below when you try our Raspberry Freezer Jam recipe. I can’t wait to hear how it goes!

Raspberry Freezer Jam (Low Sugar Recipe!)
Ingredients
- 4 cups mashed raspberries from about 8 cups/26 oz. fresh raspberries or frozen raspberries*
- 3 ½ cups granulated sugar (700 grams)
- 1 (1.75 oz.) package Sure Jell fruit pectin for less or no sugar needed recipes** (PINK box)
- 1 cup water
Instructions
- Clean & Dry Your Jars. Before you start, make sure your jars and lids are very clean and completely dry. Set them close to your work station so you can easily fill them when the jam is done.
- Prep Your Station. Gather a ladle or spoon and a funnel, if using, to help you pour the finished jam into jars. Set them next to the clean jars, along with a damp washcloth to help you clean up any messes.
- Mash & Measure The Raspberries. Next, use a potato masher (best) or fork to mash the raspberries in a large bowl. I find raspberry freezer jam sets up best when I don’t have any large clumps or chunks, so you want the mixture fairly uniform. Measure the mashed fruit to make sure you have EXACTLY 4 cups. (No more, no less.)
- Measure Remaining Ingredients. Then, measure exactly 3 1/2 cups sugar, set aside one box of pectin for low-sugar and no-sugar recipes, and exactly 1 cup of water.
- Boil Sugar & Pectin Mixture. In a large saucepan, combine sugar, pectin, and water. Whisk constantly over medium-high heat to bring to a boil. Boil exactly 1 minute once the mixture is truly boiling (bubbles all across the surface, not just some here or there).
- Remove From Heat & Stir In Fruit. After 1 minute of boiling, remove the pan from the heat and immediately add the mashed raspberries. Whisk or stir for 1 minute to combine completely.
- Pour Into Jars & Cover. As quickly as you can, spoon or pour the jam into your clean jars, leaving 1/2-1 inch of room at the top of each jar to allow for expansion in the freezer. Wipe up any spills around the rim or sides, then cover tightly with a lid. Repeat until all the jam is in jars.
- Let Jam Rest 24 Hours At Room Temperature. Allow the jars to sit at room temperature for 24 hours to set up. After 24 hours, you’ll be able to tell if your jam set properly. It shouldn’t slosh if you tilt the jar side to side. Instead, it should move slowly when tilted or not at all.
- Freeze Jam. Transfer the jars to the freezer and freeze up to 1 year. Thaw jars in the refrigerator when you’re ready to use. Open jam should be stored in the refrigerator up to 3 weeks.
Notes
- *Feel free to use thawed frozen raspberries to make freezer jam! I do it all the time.
- **Make sure you’re using pectin for less sugar or no-sugar recipes. Traditional pectin (yellow box, for Sure Jell) will not work in this recipe, as the ingredients in this recipe are formulated for less sugar.
Video
Find the recipe:
sweetsandthankyou.com/raspberry-freezer-jam/This recipe was originally shared in August 2022. Updated with additional recipe notes, step-by-step photos, and new video and republished April 2026. Here are a few of our original photos:


This was so quick and easy to make. It tastes great. Thanks for the clear instructions on the timing.
Quick, easy, and delish! The lower sugar is a must. My prayer group is asking for the recipe. Big hit!! Ty
So glad it was a win for you Rebecca!! THANK YOU for taking the time to leave such a kind review!
Sounds great, looking forward to making it. Can you use sugar substitute, like Allulose for the sugar? I assume it would the same amount
I haven’t ever made it with a sugar substitute. When I searched on SureJell’s site to see what they had to say, they do NOT recommend sugar substitutes since it can impact the set of the jam. They say:
“Sure-Jell Low Sugar and No Sugar Needed recipes contain pectin, which is derived from citrus or regular fruit. The proportions of sugar and acid needed for regular pectin to gel are different than low methoxyl (LM) pectin. Sure-Jell Low Sugar uses a combination of regular and LM pectin.”
That said, they DO include directions for how to make freezer jam with Splenda on their website & in their packaging. That’s probably your best bet, unless you want to google a recipe that specifically accounts for allulose. Cheering you on!
Mine did not set after 24 hours. Any suggestions?
DANG! I never run into that problem with this recipe (did you use a timer and measure the fruit exactly?), but if it’s still not set, Sure Jell has a few tips that can help.
Turned out great! Remarkably easy to make and it gets me that raspberry taste even when berries are out of season.
Do I need to drain berries if I’m using frozen ones?
I don’t. If you want a firmer set (more jelly-like), you can drain the extra liquid, but I usually leave it in!